Discover TÜV-certified GoogleTest with Agentic AI for C/C++ testing!
Get the Details »
Parasoft Blog


Understand the basics and scale your unit testing practice like a pro with this tutorial.
Jump to Section
Do you want to skip the basics and see how to automate unit test generation enhanced with AI to go from 0 to 60%+ code coverage in <5 minutes? Check out Jtest >>
JUnit is the most popular Java unit testing framework. An open-source framework, it’s used to write and run repeatable automated tests.
JUnit established itself as the de facto standard for Java unit testing through a combination of powerful, well-designed features that work together seamlessly. It was the first unit test framework developed, and it has remained the preferred choice for Java developers worldwide through its distinct characteristics and continued evolution.
As with anything else, the JUnit testing framework has evolved over time.
JUnit 4.0 was released in 2006, 5.0 was released in 2017, and 6.0 was released in September 2025.
As of February 2026, the latest version is 6.0.2.
Here are some of the key aspects and features of JUnit along with differences between versions:
| Feature/Aspect | JUnit 4 | JUnit 5 | JUnit 6 |
|---|---|---|---|
| Original Release Year | 2006 | 2017 | 2025 |
| Architecture | Monolithic architecture with all functionality in a single jar | Provides 3 modules: JUnit Platform (foundation for launching tests), JUnit Jupiter (API for writing tests), and JUnit Vintage (runs older tests) | All 3 modules now share the same version number |
| Minimum Java Version | 5 | 8 | 17 |
| Test Naming | Method name serves as the test name | The @DisplayName annotation allows descriptive, human-readable test names | Same as JUnit 5 |
| Setup and Teardown of Tests | Provides annotations to configure state before each test or all tests in a class: @Before, @After, @BeforeClass, @AfterClass | Provides different annotations to configure state before each test or all tests in a class: @BeforeEach, @AfterEach, @BeforeAll, @Afterall | Same as JUnit 5 |
| Assertions | Provides methods in org.junit.Assert class to verify expected results. If one assertion fails, the rest of them are not run. | Provides methods in org.junit.jupiter.api.Assertions class with improved failure messages, including assertAll() to verify multiple assertions at once regardless of whether one of them fails. | Same as JUnit 5 |
| Verifying Expected Exceptions | Provides @Test(expected = Exception.class) annotation to verify that assertion was thrown, but can't verify exception message or details | Provides assertThrows() method that allows detailed assertions on exception message and details | Same as JUnit 5 |
| Performance Verification and Enforcement | Provides @Test(timeout = 1000) annotation to assert that test doesn’t run past the expected time and to prevent infinitely running tests | Provides assertTimeout() and assertTimeoutPreemptively() methods to assert performance of specific code blocks and @Timeout annotation for entire test | Same as JUnit 5 |
| Parameterized Tests | Requires separate runner specified by @RunWith(Parameterized.class) annotation within separate test class | First-class support via @ParameterizedTest annotation that allows parameterized tests to be mixed with non-parameterized tests | Uses modern CSV parser for better behavior and performance for @CsvSource and @CsvFileSource annotations |
| Disabling Tests | Provides @Ignore annotation that silently skips test | Provides @Disabled annotation for both individual test methods and entire classes that supports reporting a reason | Same as JUnit 5 |
| Nested Tests | Not supported | Provides @Nested annotation that enables inner test classes for better organization of related tests | Updated ordering for @Nested classes that are declared in the same enclosing class or interface |
| Test Grouping | Provides @Category annotation to group tests but requires separate runner and category classes | Provides @Tag annotation to group tests using a simple label; does not require a separate runner | Same as JUnit 5 |
| Test Preconditions | Provides methods in Assume class to control whether test is run based on specified environment factors | Provides enhanced assumption method Assumptions.assumeThat() that allows fine-grained control for running a specific code block based on environment | Same as JUnit 5 |
| Customization of Behavior | Provides runners and rules to support customization of the test framework behavior, but they have some limitations | Uses a single flexible Extension model | Uses same extension model as JUnit 5 but it has been cleaned up |
| Backwards Compatibility | Can run JUnit 3 tests | Can run JUnit 3 and 4 tests via the Vintage engine | The Vintage engine still exists but is deprecated |
These features combine synergistically to create a complete, extensible framework that supports professional software development practices.
So let’s dive in. Here are the steps to set up JUnit.
The more common IDEs, such as Eclipse and IntelliJ, will already have JUnit testing integration installed by default.
If you’re not using an IDE and perhaps relying solely on a build system such as Maven or Gradle, the configuration of JUnit is handled via the pom.xml or build.gradle file, respectively.
It’s important to note that JUnit 5 was split into three modules, one of which is a vintage module that supports execution of JUnit 4 and three tests from JUnit 5.
JUnit 6 keeps this architecture.
JUnit 3 usage is very low at this point and is usually seen only in much older projects.
Because of the modular fashion of JUnit 6, a Bill of Materials POM is used to import all JUnit modules and dependencies. If only specific modules are needed, individual groups or artifacts can be specified instead.
To add JUnit 6 to Maven, add the following to pom.xml:
<dependencyManagement>
	<dependencies>
		<dependency>
			<groupId>org.junit</groupId>
			<artifactId>junit-bom</artifactId>
			<version>6.0.2</version>
			<type>pom</type>
			<scope>import</scope>
		</dependency>
	</dependencies>
</dependencyManagement>
<dependencies>
	<dependency>
		<groupId>org.junit</groupId>
		<artifactId>junit-bom</artifactId>
		<version>6.0.2</version>
		<scope>test</scope>
	</dependency>
</dependencies>
For Gradle, add the following to the build.gradle file:
dependencies {
	testImplementation platform("org.junit:junit-bom:6.0.2")
	testImplementation "org.junit.jupiter:junit-jupiter-api"
	testRuntimeOnly "org.junit.jupiter:junit-jupiter-engine"
	testRuntimeOnly "org.junit.platform:junit-platform-launcher"
}
test {
	useJUnitPlatform()
}Because of the modular fashion of JUnit 5, a Bill of Materials POM is used to import all JUnit modules and dependencies. If only specific modules are needed, individual groups or artifacts can be specified instead.
JUnit 5 is configured in the same way as JUnit 6:
<dependencyManagement>
	<dependencies>
		<dependency>
			<groupId>org.junit</groupId>
			<artifactId>junit-bom</artifactId>
			<version>5.14.2</version>
			<type>pom</type>
			<scope>import</scope>
		</dependency>
	</dependencies>
</dependencyManagement>
<dependencies>
	<dependency>
		<groupId>org.junit</groupId>
		<artifactId>junit-bom</artifactId>
		<version>5.14.2</version>
		<scope>test</scope>
	</dependency>
</dependencies>
For Gradle, add the following to the build.gradle file:
dependencies {
	testImplementation platform("org.junit:junit-bom:5.14.2")
	testImplementation "org.junit.jupiter:junit-jupiter-api"
	testRuntimeOnly "org.junit.jupiter:junit-jupiter-engine"
	testRuntimeOnly "org.junit.platform:junit-platform-launcher"
}
test {
	useJUnitPlatform()
}To add JUnit 4 to Maven, add the following to pom.xml.
<dependency>
	<groupId>junit</groupId>
	<artifactId>junit</artifactId>
	<version>4.13.2</version>
	<scope>test</scope>
</dependency>
For Gradle, add the following to the build.gradle:
dependencies {
	testImplementation 'junit:junit:4.13.2'
}
test {
	useJUnit()
}
If you need to manually add JUnit to the classpath for JUnit testing, you need to reference the raw jar file(s) directly, although this isn’t usually required. JUnit 4, 5, and 6 all have the jar available to download directly. For JUnit 5 and 6, you’ll need to download a fat jar (aka uber jar) as described here.
Improve Unit Testing for Java With Automation: Best Practices for Java Developers
Now that we’ve talked a little about JUnit setup, let’s move on to the actual construction and execution of these tests. To best illustrate the creation of JUnits, we’ll start with something basic. In the JUnit test example below, we have a simple method (left) that converts Fahrenheit to Celsius and a JUnit test (right) written to test our method. I’ve numbered the key parts of the JUnit test and will discuss each part in detail below.
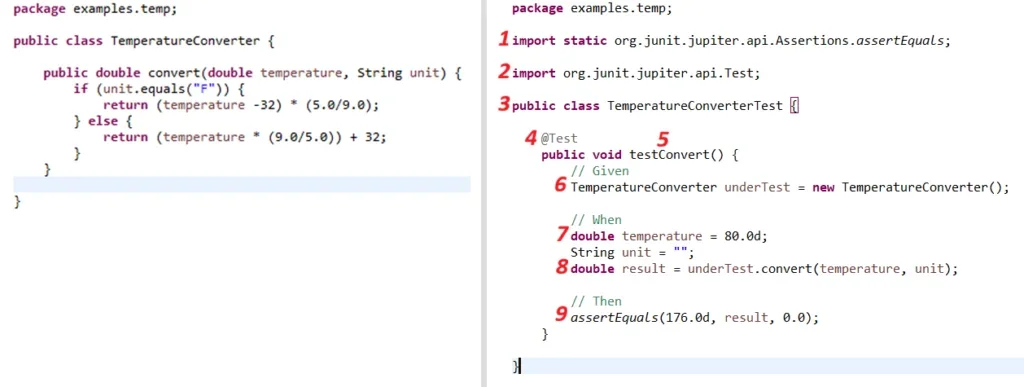
Parts 1 and 2 in the above screenshot are imports for the JUnit classes and methods used by the unit test. The imports can be specified as individual classes or methods, but are commonly specified as entire packages using asterisks. Either way works—the level of granularity of the imports is a matter of preference.
Part 3 defines the start of our test class. The important thing to take note of here is the naming convention used for the class, which is ClassNameTest. This naming convention is not required, but it’s the most common way to name JUnit classes because the name succinctly describes the purpose of the unit test class and which class it is testing.
In Part 4, we see our first JUnit-specific syntax: the @Test annotation. Annotations are extremely important when creating JUnits. This is how the JUnit framework identifies the important parts of the unit test. In our example, the @Test annotation tells JUnit that the public void method to which it is attached can be run as a test case.
There are many other annotations, but some of the most common for JUnit 5 and 6 are the following.
For Part 5, again, note the naming convention testMethodName, where methodName is the name of the method being tested in the class under test. This naming convention is common but is not required. Sometimes additional description is added to the name to describe specific behavior being verified by the test
In Part 6, the Given section of the test, we construct a new instance of the class under test and initialize it as appropriate. This is necessary since the test method needs to call the method under test to test it. In our example, no other initialization is needed beyond instantiating the class, but in many cases, additional setup may need to happen, such as initializing objects to pass into the constructor or calling methods that configure the state of the class under test.
In Part 7, the When section of the test includes initializing variables that need to be passed when calling the method being tested and then calling the test method (part 8). The variables should be given meaningful values that cause the test to exercise the parts of the test method that we care about. Note that if a variable is an object, it can be instantiated or mocked.
In Part 8, if the method under test returns a value, it should be captured in a variable so that its value can be asserted on.
Unit tests are only valuable if they include assertions that validate that the method being tested returns the right value and/or adjusts the state of other objects as expected. Without assertions, shown in Part 9, you have no verification. Your test is at best a smoke test that gives feedback only when an exception is thrown.
The JUnit assertion methods, which are included in the org.junit.jupiter.api.Assertions class in JUnit 5 and 6, and the org.junit.Assert class in JUnit 4, are commonly used to determine the pass/fail status of test cases. Only failed assertions are reported by the JUnit framework. Like with annotations, there are many assertion options.
In our example JUnit above, we use the assertEquals (expected, actual, delta) method. The first argument is:
Choose your own adventure! Here, we will look at three ways to run JUnits:
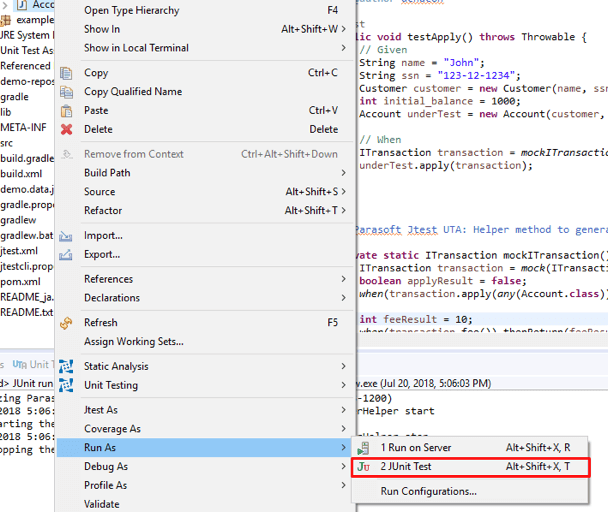
Within the Package Explorer, locate your JUnit test. Right-click and select Run As > JUnit Test. This will execute your test and report results within the JUnit Eclipse view.
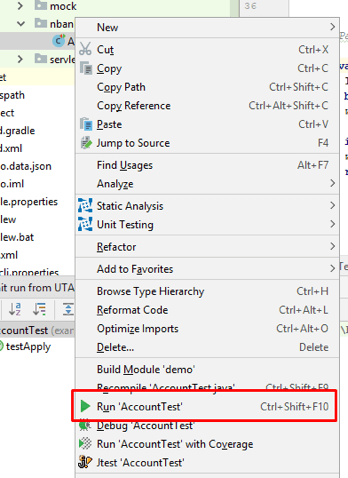
Running a test in IntelliJ is similar to Eclipse. From the Project window, locate your test, right-click and select Run ‘testName’. Like Eclipse, a JUnit window will open with the results of the test.
Maven has made running unit tests simple. Ensure you are in the proper location in your console, and the project pom.xml is properly configured. Then you can run the following to execute your JUnits.
To run the entire test suite:
mvn testTo run a single/specific test(s):
mvn -D test=TestName testGradle, like Maven, has made running tests simple.
To run the entire test suite:
gradlew testTo run a single/specific test(s):
gradlew -D test.single=testName testNote: Maven and Gradle are their own beasts. What is shown here is minimal to cover the basics. Check out their documentation if you want to learn more.
To run a JUnit directly from the command line, you need a few things:
The easiest way to do this in JUnit 5 and 6 is to use the JUnit Console Launcher as follows.
java -jar /path/to/junit-platform-console-standalone-<version>.jar execute -cp /path/to/source/classes -cp /path/to/test/classes <test class name>Note: Running a test from the command line is most commonly done from a CI/CD process running in a build system like Jenkins or Azure DevOps.
Our example ran through a simple unit test, and of course, this is just the start of unit testing. More complex methods that need to be tested may call methods in dependent classes, or connect to external systems like a database. In these kinds of cases, it may be desirable to isolate the code through mocking.
Mocking helps to isolate units of code so that our unit tests can focus only on the specific class/method being tested. The most common framework used for mocking in JUnit tests is Mockito.
To learn more about mocking, read my colleague’s post: How to automate a Java unit test, including mocking and assertions.
If unit testing is so important, why doesn’t everyone do it consistently? Despite its importance, unit testing isn’t always easy to implement or maintain. It requires deep development knowledge and ongoing effort to keep test suites current. As a result, unit testing often gets deprioritized—until regressions happen.
But it doesn’t have to be that way.
This is where Parasoft Jtest comes in. Its AI-powered Unit Test Assistant was designed to remove the friction from writing and maintaining unit tests. With just a few clicks, teams starting with 0% code coverage can automatically generate robust test suites that cover 60% or more of their Java code. As one financial services firm noted, "Since we implemented Parasoft Jtest, we have successfully reduced the amount of time it takes to create and maintain unit tests by more than 50%."
Here’s how your team can scale your testing practice.
If writing and maintaining JUnit tests has felt like a chore, it’s time to modernize your approach. AI-enhanced testing solutions like this can turn test creation from a bottleneck into a strategic advantage—giving you more time to focus on building great software.
Make unit testing easier and faster with AI-enhanced Parasoft Jtest.
Try it yourself with a free, full-access trial for 14 days.


