Use Agentic AI to generate smarter API tests. In minutes. Learn how >>
Deploying Static Analysis and Unit Testing in Containerized Environments, Part 1
Curious about containerized environments? Learn what they are, why your team should use them, and best practices. Then walk through how to configure Parasoft C/C++test for containerized development environments.
Jump to Section

Curious about containerized environments? Learn what they are, why your team should use them, and best practices. Then walk through how to configure Parasoft C/C++test for containerized development environments.
Containerized environments have gained significant popularity in recent years due to their ability to streamline the deployment and management of applications. A container is a lightweight, standalone package that includes everything needed to run an application, including the code, runtime, system tools, and libraries. It encapsulates the application and its dependencies, providing a consistent and isolated environment across different platforms and operating systems.
Understanding containerized environments is essential for software developers as it revolutionizes how applications are built and deployed. One of the key benefits of containerization is its portability.
Containers encapsulate the entire runtime environment, including the application code, libraries, and configurations. This enables developers to create a container image once and run it on any system that supports containerization, such as Docker or Kubernetes. It eliminates the "it works on my machine" problem, as the container runs consistently across development, testing, and production environments. This portability greatly simplifies the deployment process, making it easier to move applications between different hosting environments or scale them up or down as needed.
Another advantage of containerization is the ability to isolate applications and their dependencies. Containers use operating system-level virtualization to create isolated instances that share the same host operating system. This isolation ensures that applications running in one container do not interfere with or affect applications in other containers, providing a more secure and stable environment. Developers can confidently experiment with different libraries, frameworks, and configurations without worrying about conflicts or compromising the stability of the overall system.
A containerized development environment is the practice of using containers to encapsulate and manage the software development environment. It involves creating a self-contained, isolated environment that includes all the necessary tools, dependencies, and configurations required for developing an application.
In a containerized development environment, the development tools, programming languages, libraries, and other dependencies are packaged into a container image. This image serves as a portable and reproducible representation of the development environment. Developers can create, modify, and share these container images to ensure consistency and facilitate collaboration among team members.
By using containerization technology, such as Docker, developers can create lightweight, standalone containers that are isolated from the host system and other containers. Each container provides a consistent and uniform environment, regardless of the underlying host operating system or machine configuration.
Containerized development environments offer several benefits, such as ensuring consistency across different machines, among team members, especially in the embedded software system development environment, which can be very complex. A containerized environment allows developers to work with the same software stack, libraries, and configurations, eliminating compatibility issues and reducing the time spent on environment setup.
In other words, containerized environments enable easy setup and reproducibility. Developers can package their applications along with all the required dependencies into a container image. This image can be shared, allowing others to quickly set up the same development environment. It ensures that the application behaves consistently across different environments, facilitating collaboration and deployment processes.
Another benefit of containerized development environments is that they provide flexibility. Developers can switch between projects or different versions of software without conflicts. Each project can have its dedicated container, isolating its dependencies and configurations. This flexibility allows for parallel development and software testing. It facilitates a powerful CI/CD workflow by automating static analysis and unit testing for each developer upon a successful code build. This workflow enables high-quality code by finding defects before the code is committed to the master repository.
Additionally, containerization enhances scalability and resource efficiency. Containers are lightweight and have minimal overhead, allowing developers to make efficient use of system resources. Multiple containers can run on a single host machine, enabling parallel development and testing. This scalability is beneficial when working on large projects or distributed systems.
Using a containerized development environment offers several advantages for software development teams. Here are some reasons why developers should embrace containerization.
When it comes to containerized development environments, following best practices can greatly enhance productivity and ensure smooth development workflows. Here are some key guidelines to consider.
Dockerfiles are essential for defining the configuration and dependencies of your containerized environment. Instead of manually configuring containers, use Dockerfiles to automate the process. Start with a base image, specify the necessary dependencies, and include the commands to build and run your application. This approach ensures consistency and reproducibility across different environments.
Container orchestration platforms like Kubernetes provide powerful tools for managing containerized applications at scale. They enable features such as auto-scaling, load balancing, and service discovery. Embracing container orchestration simplifies deployment and monitoring, making it easier to manage and scale your applications effectively.
Keep your container images as small as possible by minimizing the number of layers and removing unnecessary dependencies. Smaller images are faster to build, transfer, and deploy. Additionally, ensure that your containers are properly configured for resource management. You can use Parasoft C/C++test to simplify the process of creating a container image. Use C/C++test to easily set resource limits and requests appropriately to prevent containers from consuming excessive resources and affecting the performance of other containers.
Manual setup of development environments can be time-consuming and error-prone. Instead, automate the process using configuration management tools like GitHub or provisioning tools like Vagrant. With automation, you can quickly spin up or tear down containerized development environments with just a few commands, reducing setup time and ensuring consistency across the team.
Containers should be treated as ephemeral, disposable entities. Regularly update your container images and base images to include the latest security patches. Avoid running containers with unnecessary privileges and enforce strict access controls to minimize the risk of unauthorized access. Additionally, consider scanning container images for vulnerabilities using tools like Clair or Anchore.
Treat container images as code artifacts and leverage version control systems to manage them. Maintaining a version history of your container images allows you to easily roll back to a previous state if issues arise. Additionally, using a container registry allows for easy distribution and sharing of container images across your development team.
While following these best practices can ensure efficient and reliable containerized development environments, providing code quality and reliability in containerized environments remains a critical concern for developers. Deploying static analysis and unit testing in containerized environments offers a powerful solution to address these challenges. Below is a detailed explanation of how developers can leverage ParasoftC/C++ to use Docker containers efficiently.
Parasoft C/C++test is easy to use with Docker containers. I’ll walk you through the steps to configure C/C++test to work in containerized development environments.
Containerized deployments of development tools are becoming the bread and butter of embedded development teams. Even though containers were initially developed to solve problems with the deployment of microservices and web-based applications, they recently gained popularity among embedded teams — especially big teams that use containers to manage complex toolchains.
When it comes to managing complex development environments, especially in the safety-critical space, teams usually struggle with the following challenges:
All these problems are easy to solve with containers. No wonder teams love containers! Let’s have a look at how to configure C/C++test for use in a containerized environment.
It’s easy to configure Parasoft C/C++test Professional to work with a compilation toolchain and the execution environment deployed in containers. We support deployments that are based on Linux and Docker containers. Here’s a high-level overview of how that type of setup looks:
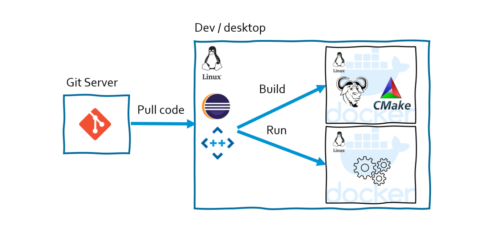
As you can see, C/C++test accesses the containerized compiler (GNU GCC) and the runtime environments. In this specific setup, there are two separate Docker containers:
Let’s see how to configure C/C++test Professional to work with an in-container compilation toolchain and execution environment. In the example, we’ll use the latest GCC container image available via the Docker hub.
Let’s see how to configure C/C++test Professional to work with an in-container compilation toolchain and execution environment. In the example, we’ll use the latest GCC container image available via the Docker hub.
The following instructions assume you have a Docker engine correctly installed and configured in your environment. And the same for C/C++test Professional.

To make creating a demo project super simple, let’s create the default "HelloWorld" project using the standard "New Project" wizard.

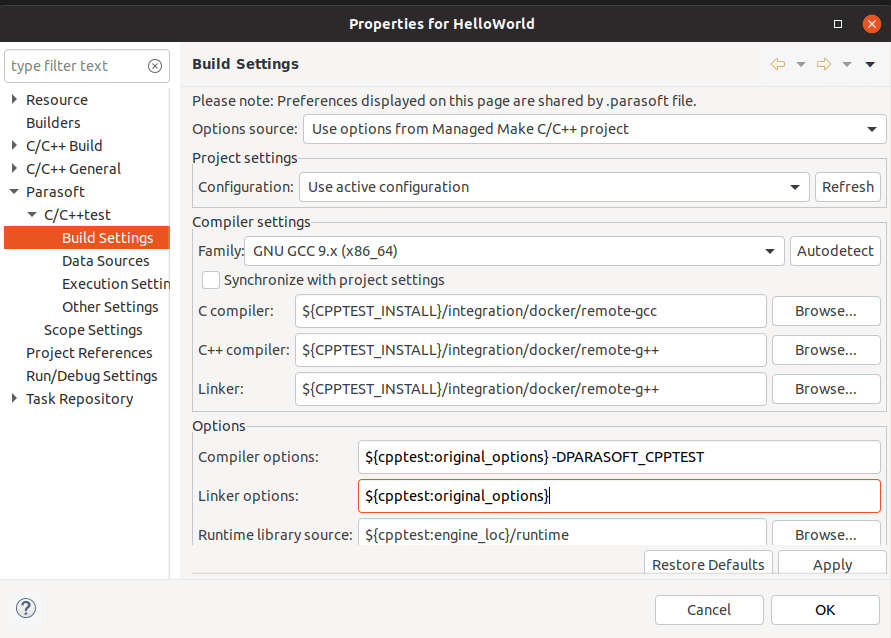
Once the project is created, modify a couple of items in the C/C++test Build Settings.
Make sure that the container with your compilation toolchain is up and running before using Parasoft C/C++test.
The compiler wrappers that we set up in the previous step are designed to execute the compiler commands in the running container, which is faster than starting the container for every invocation.
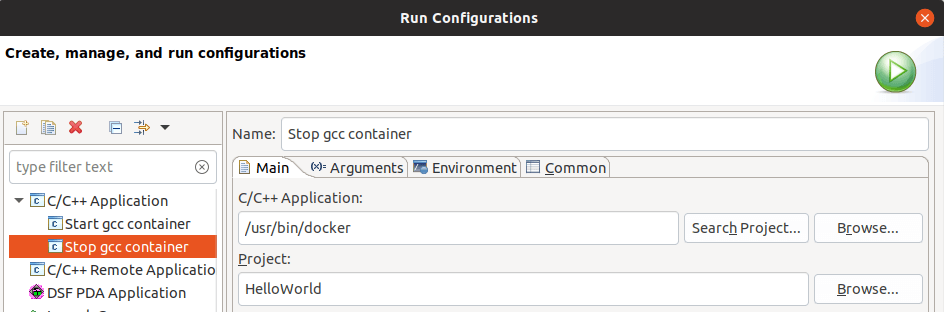
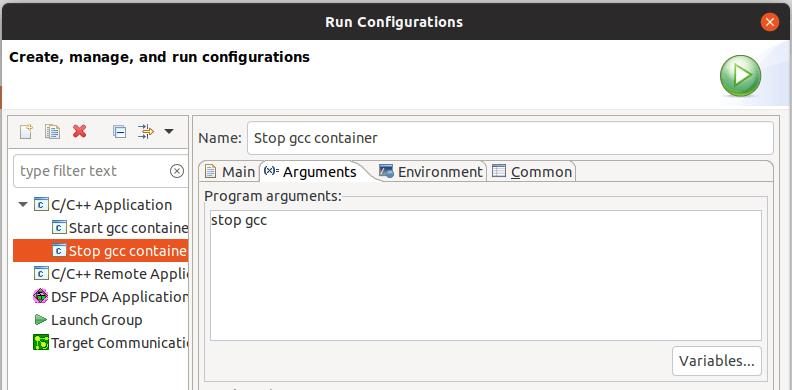
For CI/CD deployments, starting the container before C/C++test runs and stopping it after can be a part of the Jenkins job. In this example, we assume GUI base is used. We can create eclipse Run Configurations for this purpose. I suggest creating two configurations of "C/C++ Application" type and naming them as follows:
style="padding-left: 40px;">run –rm -d -it –name gcc -v ${env_var:HOME}:${env_var:HOME}
-v ${env_var:CPPTEST_INSTALL}:${env_var:CPPTEST_INSTALL} gcc
As shown in the screenshot below:
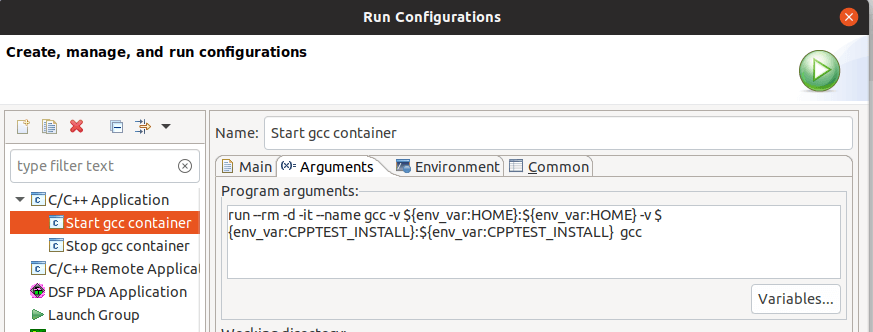
The interesting part of this command are -v options, which are used for mapping volumes.
The first -v option maps the local HOME directory to the container file system. The intention here is to enable access to the source code for the compiler operating inside the container and also for Parasoft C/C++test, which runs in the host operating system.
I’m using HOME in my example for convenience because I placed my workspace directly in HOME.
For real setups, you can strictly map only the part of the file system that contains the source tree and the eclipse workspace with project.
The second -v option maps the location of C/C++test installation directory to enable access to C/C++test header files inside the container.
stop gcc
Eclipse console should show you the hash of the container. To make sure everything is all right, you can switch to the command line and invoke the following command:

If you see our "gcc" container on the list, you’re good to start using C/C++test for testing your code.
You should see a new "tests" directory created inside your project with a single unit test created for the "main" function.
C/C++test should invoke a collection of in-container compilations and linking command lines, ending with a test binary creation and execution in the container.
That’s it! With these steps, you prepared Parasoft C/C++test to perform testing activities using the in-container compilation toolchain.
If you need to change the compiler for a project or modify something in the runtime execution environment, you can either update the container image or change it to a different version. (Remember to update the CPPTEST_CONTAINER_NAME variable.)
Want to learn more? Read part 2 where I explain how to deploy static analysis and unit testing using Parasoft C/C++test Standard in a Docker container.

